| node and connection setup |
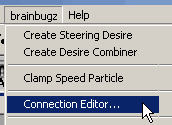
To edit the relations between the different desire nodes and set up a working behavioural system, you should use the Connection Editor. To start this editor, choose the item "Connection Editor..." in the brainbugz menu:

The bb Connection Editor will show up:
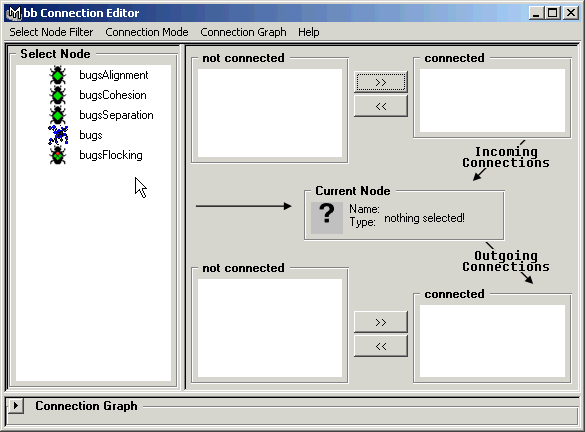
| bb Connection Editor Menu Items | |
| Select Node Filter |
"Steering Desires" "Desire Combiner" "Particles" "Fields" |
| Connection Mode |
"Incoming" "Outgoing" "Both" |
| Connection Graph |
"Focus Selected" "Stick to Particle" |
[this is not necessary any more as everything was automated, use this for references on the insights]
A detailed description of the steps required to build the 'brain' of the bugs, the setup of the bbNodes and connections:
| steering desire creation |
Steering Desires are the basis of behavioural animation, they tell the individual bug how to behave. To create a steering desire, create a bbSteeringDesire node using the Command Line or Script Editor:
createNode bbSteeringDesire -n bbSD;
bbSteeringDesire is a particle field node, so you can use it just like any other field (Gravity, Vortex etc.) in Maya. You can connect it to your particle object using MEL:
connectDynamic -f bbSD particle1;
Open the Hypergraph, the graph should look somewhat like this:

You can now edit steering desire attributes by selecting the bbSD node and opening the Attribute Editor. For a detailed description of the steering desire attributes, see detailed node descriptions.
You can keep adding bbSteeringDesires by using the above method. Output forces of the steering desires will be combined linear in the particle object. This may be suitable in some situation, but to achieve better results other combination methods must be used.
| combination of steering desires |
To combine the output forces of bbSteeringDesire nodes, use the bbCombineForces node. To create one, use MEL.
createNode bbCombineForces -n bbCF;
Now you have created a bbCombineForces node (bbCF) , it must be connected to bbSteeringDesire nodes (bbSD). Use the 'bbConnect' command to connect steering desires outputForce, weight and priority with the force combiner:
bbConnect bbSD bbCF 0;
Note: Make sure to use the same array index for all of the connections of one specific bbSteeringDesire to an bbCombineForces node. This is required so the bbCombineForces knows, which priority and weight belongs to what force.
Connect the bbCombineForces outputForce to the particles input force.
bbConnect bbCF particleShape1 0;
If you already connected the steering desires to the particle node using the
'connectDynamic' command as described above, delete the connection from the
bbSteeringDesire node to the particle node using the Hypergraph.
If the bbSteeringDesire node never was connected to the particle object,
connect it now:
bbConnect particleShape1 bbSD 0;
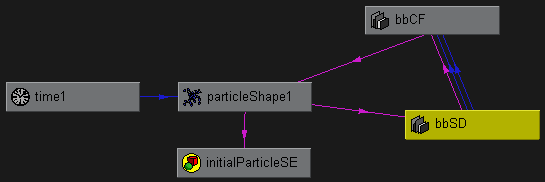
Hypergraph should look like this if you connected all the attributes correctly:
Repeat these steps to add more steering desires for the particle object- of
course, just the connections from the particle node to the steering desire and
from the steering desire to the force combiner are needed.
When you are finished, Hypergraph may look like this:
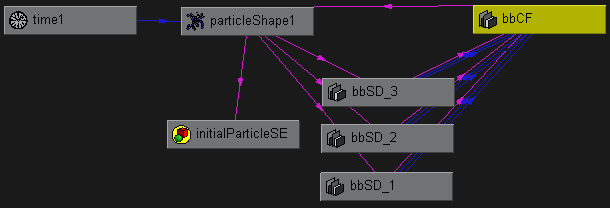
Commands to create the above node setup (it is assumed, you already created the particle object):
// create steering desire nodes
createNode bbSteeringDesire -n bbSD_1;
createNode bbSteeringDesire -n bbSD_2;
createNode bbSteeringDesire -n bbSD_3;
// create force combiner node
createNode bbCombineForces -n bbCF;
// connect particle node with steering desires
bbConnect particleShape1 bbSD_1 0;
bbConnect particleShape1 bbSD_2 0;
bbConnect particleShape1 bbSD_3 0;
// connect steering desires with force combiner
// note the use of different index values when
// connecting to array attributes
bbConnect bbSD_1 bbCF 0;
bbConnect bbSD_2 bbCF 1;
bbConnect bbSD_3 bbCF 2;
// connect force combiner with particle node
bbConnect bbCF particleShape1 0;
You can now edit combine forces attributes by selecting the bbCF node and opening the Attribute Editor. For a detailed description of the combine forces attributes, see detailed node descriptions.
Note: Of course you can use bbCombineForces without bbSteeringDesire to gain more control on how force fields effect particles.
| connecting geometry to steering desires |
Some steering desires need geometry input. Currently you can connect locators, nurbsCurves and nurbsSurfaces to steering desires. the bbConnect command helps you to complete this task, too.
// examples
bbConnect locator1 bbSD 0;
bbConnect locator2 bbSD 1;
bbConnect locator3 bbSD 2;
bbConnect curve1 bbSD 0;
bbConnect curve2 bbSD 1;
bbConnect nurbsSphere1 bbSD 0;
bbConnect nurbsPlane1 bbSD 1;
Note: Be sure to connect locator / nurbsCurve / nurbsSurface nodes with bbSteeringDesires only and not their transform nodes!
| using fields as steering desires |
Every force field in Maya can be used as a steering desire - so the former phsical force applied to particles becomes a desire, which bugs may follow. You just have to add the weight and priority attributes to the fields, which they are missing.
bbConnect fieldName bbCF 0;
| advanced connection setup |
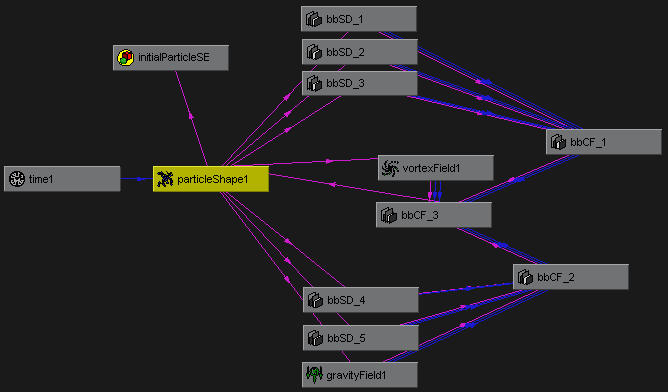
To achieve more complex behaviours, you can use bbCombineForces nodes as inputs for other bbCombineForces nodes. This may be used to switch between different sets of steering desires or in general, if the given combination modes do not fit your needs but the combination you desire may be achieved by hierachising the steering desires (e.g. Priorized Weighting, Weighted Priorization, etc.).
Such an setup may look like this - but you are free to build far more complex ones :-)
| limiting bug velocity |
As stated before, in behavioural animation forces are self applied and hence limited. But speed of Maya particles can grow unlimited - so some changes have to be made to achieve the effect of limited speed:
bbClampSpeed particleShape1;
This will add attributes Minimum - and Maximum Speed which are used in a runtime expression, to clamp particle velocity.
As you see, MEL scripts bbConnect and bbClampSpeed save you a lot of tedious expression editing and scripting. Use them to speed up creation of behavioural animation setups.